Friday 31 August 2007

Hash Algorithm - MD5

I like to share the hash algorithm called MD5, because when people are exposed to open-source software they will encounter this MD5 hash value. So what is it actually?

In cryptography, MD5 (Message-Digest algorithm 5) is a widely used cryptographic hash function with a 128-bit hash value. As an Internet standard (RFC 1321), MD5 has been employed in a wide variety of security applications, and is also commonly used to check the integrity of files. An MD5 hash is typically expressed as a 32-character hexadecimal number. (Ref: Wiki)

The above paragraph is the definition but what is so special about it? Ok, now I'm only interested in "integrity of files". You will notice that some open-source softwares come with MD5 hash value.

Here is a story when you don't make use of MD5 hash value.

1. You download a program from the internet, and that program includes a MD5 hash value.
2. But you just ignore the hash value... you try to install the program.. but fail at the middle of installation!!! (what a waste of time)
3. And you are still very stubborn, you want to make a second try!!! (again.. what a waste of time). Fail!!!
4. Now you just realise that the program you have downloaded is CORRUPTed. So you download a new one. Back to Square One.

Here is a story when you make use of MD5 hash value.

1. You download a program from the internet.. and you know the MD5 hash value.
2. After you download it, you check the program integrity using MD5 hash function and found out the output hash value is the same with the given one. Since it's equal.. obviously no problem (with confident), and no need to re-download the same program.
3. You install it... happy ending.

Enough of story!!! The moral of the story, you have to check the integrity of any files you download. This will tell whether the program is corrupted or not (maybe caused by fail transfer, virus, fake file, etc). This will also save you time.

There are many softwares out there that can check MD5 hash value, but I like to introduce Ash's MD5/SHA-1 Checker. (Princess Ashe~.. FFXII.. not relevant!!).

Proceed to the technical usage:-

1. Download the program here. (Current latest version is v0.9.7 and get md5-checker-0.9.7.exe for windows user).

The program md5 hash value is:-
aa4862b97b09f0bb8263bf7a82e885da

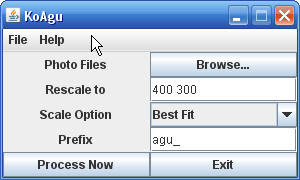
2. No installation required!!! Just run it as usual. Below is the program screenshot.


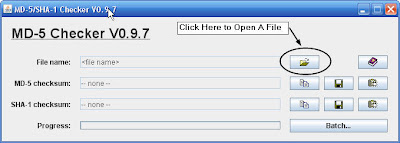
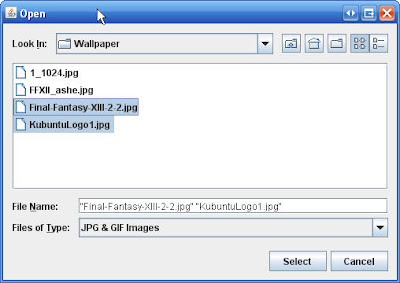
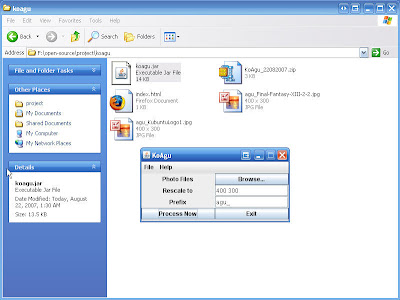
3. Try to check the program integrity itself. Click the "open file" dialog as shown in the above screenshot.


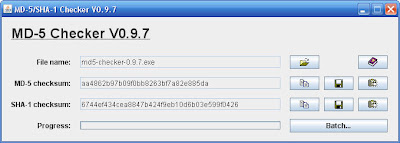
Once the file (e.g the program itself) is loaded, the hash value is generated automatically. As you can see in the screenshot above, the MD5 hash value is equal to the given one.

p/s: I don't know why this program uses the word checksum instead of hash value. Too many jargons!!

I will include md5 hash value for any program (if it has one) that I discuss in the future. Bah.

Thursday 23 August 2007

WhatsNew - KoAgu v0.1a

KoAgu 0.1a

* Added: Scale Option -> bestFit + stretchToFit
* Fixed: Rescale issue, now only accept dimension lower than the original file
* Improved: N/A


I'll add/fix several features from time to time. Wait till the next release (dunno when, now I'm lazy :D)

Wednesday 22 August 2007

KoAgu - First Version

I'm naming my thumbnail maker program as KoAgu... not so important!!! Ok la, just for a couple of hours I manage to get my program working using simple compression algorithm and only support jpg file at the moment. Here are the screenshots.

1. The Main Window


As you can see, there's Browse button to browse pics to be resized. I also provide rescale option where the two numbers are the pic dimension after rescaled. The first number is its width (e.g 400) and the second number is its height (e.g 300). By default I put "400 300" but users can change it as they wish.

Prefix is used to name the files that have been resized, e.g. if your original filename is "duolulu.jpg", and your prefix is "agu_", then the new filename will be "agu_duolulu.jpg". I included this feature in case user accidentally replace the original file.

2. After a user click Browse button, a pop-up window will appear. This allow the user to select "jpg" file to be processed. To select more than one file at a time.. hold the Ctrl key at the keyboard + select the chosen files.


3. Then finally, click the Process Now. Done!!! Check the new files inside the program directory.


You can download it here (get the bytecode). This program is not good enough. Ah.. what do you expect for a program that is written only for a few hours.. bah.

Tuesday 21 August 2007

My Boring Project - Thumbnail Maker

I'm not quite busy these days, so why not creating a useful program (self-interest). Ah.. almost everyday I chat with my friend(s) in msn, and sometimes we exchange new photos (not self photos.. :D). Every photo has a size about 1++mb, so I usually resize each photo to reduce its size. Otherwise it will take a long time to transfer and prone to fail transfer.

Lame Problem
The problem is when I'm not exchanging for JUST one picture, but many!!! It will be time consuming if I open each picture, then resize, finally save as a new file. So I need a program that can resize and save all my photos at ONE go!!!

Lame Solution
Since I'm the one who need it so I have to program it myself.. :D

To Do List (Basic Features):-
- provide interface to browse file(s) to be resized
- resize settings e.g. new pic size.
- ...

For the time being, I'm going to implement it regardless the algorithm used. Ah.. as usual, I'm going to program it using JAVA.. no python.. no ruby.. hehe. So wait for the first version soon.. bah.

Monday 20 August 2007

Email Notifier - PopTray

I have many email accounts (during the old days), use them for different reasons. There is a time where I'm lazy to login into every of my email accounts just to see if there is new email. Ahh.. just now I login into my Brunet account, the last time I login was a long time ago, maybe almost two years. Actually, I can leave my ThuderBird open so that it can constantly check for new emails but I want another way to auto check for new emails.

"PopTray started as a little POP3 mail checker I wrote, because I couldn't find a freeware program that had all the features I wanted. Since then, new features have been added by request. After years of refinement PopTray 3.0 has now become a full-featured, customizable, e-mail notifier, but keeping its ease of use" (Ref: Renier Crause, PopTray)

Basically, the program is written for email providers that support POP protocol (e.g. Brunet mail, Yahoo mail). Later, plugins are created to support other mail protocols such as POP SSL (e.g GMail), IMAP, Hotmail Plugin, GMail plugin and so on. It has another interesting features, you can read more about them in the website here.

Time for technical stuffs!!!

Steps:-

1) Download the program here. (Current latest version is ver 3.2)

2) Install it as usual!!! (Type of installation: Full)

3) After installation, you should notice an icon of "mail" inside your taskbar. Right-click the icon and click Options. See the screenshot below (I like my wallpaper.. :D).


4) A pop-up window will appear. To add a mail account, just follow the sequence like in the screenshot below. In this example, I use Brunet mail, so the server address is "pop3.brunet.bn".

note: for other email provider, get the server information (e.g server address, port number) from the email provider.


5) By default the program will check for new mail in every 5 minutes. The screenshot below (actually got many spam plang.. deleted them) shows the preview of any new mails received. Click "To Tray" to run the program in background.


5. Ah.. what else, actually I usually change the program Options. You can explore it there, like double-click the trayicon behavior, start-up behavior, plug-in and so on!!!

Wednesday 15 August 2007

File Transfer Protocol (FTP) - FileZilla

I think most people know this software especially those who have their own webspace. But since it is an open-source program so I have to include in as well.

Definition of FTP
FTP or File Transfer Protocol is used to transfer data from one computer to another over the Internet, or through a network. Specifically, FTP is a commonly used protocol for exchanging files over any network that supports the TCP/IP protocol (such as the Internet or an intranet). (Ref: Wiki)

I think by giving example will make the definition clearer. Most common use of FTP is to transfer files from client (e.g your laptop, desktop) to the server (e.g. webhosting like bravenet and so on), and vice versa. So if you are making a website, you need this software to upload your html, php, mp3 (you name it) files to the server.

note: usually webhosting provides file upload utilities using http protocol, but using ftp will make your life easier.

FileZilla is a free, open source FTP client for Windows. It supports FTP, SFTP, and FTPS (FTP over SSL/TLS). The main features are the site manager, message log, file and folder view, and the transfer queue. (Ref: Wiki)

Ok la, just proceed to the technical usage.

Installation:-

1. Download the program here. (current release is ver 2.2.32, and dl the .exe file)

2. Install it as usual but make sure you read the instruction carefully. It's your decision.

3. The default configuration is good enough, so I don't think there is need to change the program's setting for simple task. The program screenshot is as below.


How to Use:-

1. On the menu bar at the top, click File->Site Manager, and then a pop-up window will appear. Click new site, and then create the connection name e.g testing. Then click Save and Exit.


2. To initiate a connection to the server, click as shown below. In this example I try to connect into my bruneiopensource free server.


3. Once connected, then user can upload/download files between the client and the server. I added few comments in the screenshot, hopefully it will be helpful.


Ah.. I think some of my visitors use other browser instead of mozilla firefox. Though firefox is an open-source but it will be boring if I post about firefox here, because it is well known (if you don't know it.. then google it). It's a matter of choice so there is no harm to use IE, Opera, Konqueror.. and so on.

Remember: open-source is about freedom. Bah.

Thursday 9 August 2007

CD Writing Software - InfraRecorder

What I have posted so far is still focusing on open-source applications in microsoft windows because I know most Bruneians are using ms windows. (p/s: i'm not ready to share about linux)

There are not many open-source cd burner program written for microsoft windows. Most of them are written for linux operating system only. And I like to share a cd/dvd burner called InfraRecorder.

InfraRecorder is a free graphical CD and DVD writing program for Microsoft Windows, licensed under the GPL version 2. Started by Christian Kindahl in 2006, InfraRecorder uses the cdrtools software to perform the actual burning. InfraRecorder was born in the Google Summer of Code 2006. (Ref: Wiki)

Ok, since I don't have to explain anything else....

Steps

1. Download the program here. (current latest version is 0.43.1)

2. Install it as usual.. would take less than one minute.

3. Done!!! I don't think I should give examples on how to use this program, it's just like other cd burning programs. I'll leave you with the program screenshot.


Friday 3 August 2007

CD Ripper - CDex

I'm quite busy of doing nothing recently, the main reason for me not updating this blog. Ok, the next open-source's tool I want to introduce is CD Ripper called CDex.

CDex is able to convert CD audio into several formats including WAV, MP3 (using the LAME encoder), Ogg Vorbis, VQF, APE, and many others. It supports FLAC and other codecs using an external encoder. For convenience, it supports CD-Text to allow ripped tracks, with reduced user effort, to have the names of songs, artists and albums (Ref: Wiki).

I think the above paragraph has clearly explained the use of CDex. Let me proceed on how to use the program.

Steps

1. Download the program here. Get the latest installer version, current one is CDex 1.70 (beta 2).

2. Install it as usual, should be easy.


3. Click Options->Settings->Filenames to set the directory of mp3 to be saved. And click Options->Settings->Encoder to change the encoder, in this example I'm going to use LAME encoder. The screenshot below shows the setting that I always use for CD Ripping.


4. To rip an audio CD, just insert the CD into the cd drive. Select all tracks by clicking Crtl+A, and then click F9.


I think that is enough for today. Bah.